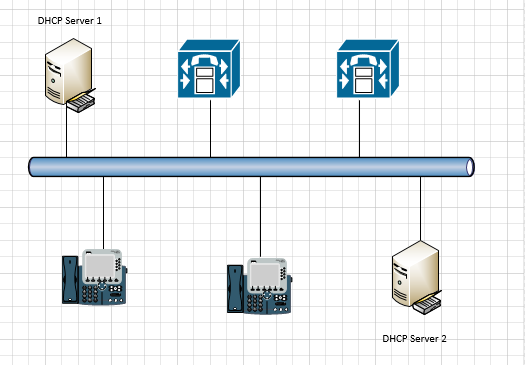
Today, let’s talking about how to configure DHCP Cluster with Cisco Call manager service (TFTP services).
DHCP server failover cluster feature provides the ability to have two DHCP servers provide IP address and option configuration to clients of the same subnet or scope.
 Note NoteIt can support only two DHCP servers in failover relationship but a single DHCP server can support up to 31 failover relationships. |
As we know, the Cisco IP phones need to get IP information and TFTP server address from DHCP servers, they get the configuration from TFTP server and register with Cisco Call Manager server.
You can follow the steps and make you DHCP services and IP Phone happier.
If you checked my blog posted -DHCP Migration – Windows Server 2003 (2008) to Windows Server 2012 R2, we have one DHCP server is ready. So, we just need to configure and add another one to be cluster.
This procedure works with windows 2016 servers as well.
Add option 150 for DHCP servers
- Logon to DGCH Server1.
- Click Start, point to All Programs, point to Administrative Tools, and then click DHCP.
- Right click on IPv4 and choose Set Predefined Options….
- click the Add… button in the Predefined options window.
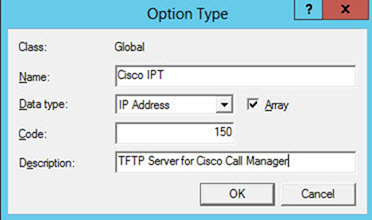
- Enter in the information as shown below, make sure Data type as IP address and checked Array and then click OK.

 Note NoteBoth DHCP Servers need to Add option as above, if you don’t create it for both DGCP servers, it will happen Configure failover failed. Error: 20010. The specified option does not exist when you Finish configure failover. |
6. Back to DHCP Manager, right click Scope Options under your scope and select Configure Scope Options….
Configure DHCP failover relationship

- Logon DHCP server1
- Open the DHCP console, right-click the IPV4 and then click Configure failover.
- In the Configure Failover wizard, confirm the Available scopes and click Next.
- In Specify the partner server to use for failover page, click Add Server and choose your 2nd DHCP Server and then click Next.
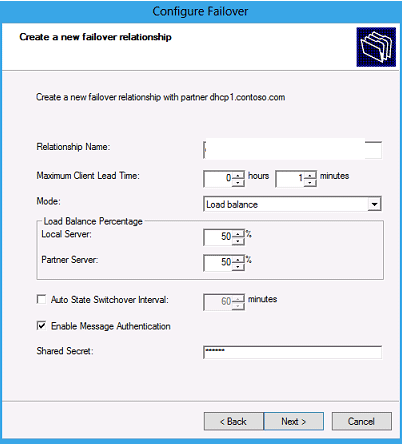
- In Create a new failover relationship, type a name next to Relationship Name, or accept the default name that is displayed.
- Type a shared secret for this failover relationship next to Shared Secret.
- Change the value next to Maximum Client Lead Time to 1 hours.
- Review the options available in the drop-down menu next to Mode. You can choose Load balance or Hot standby. By default, Load balance mode is chosen.
- Click Next and then click Finish.
- Verify that failover configuration was successful, and then click Close.
- Logon to DHCP server2.
- Refresh the DHCP console and verify that the same DHCP scope configuration that is present on DHCP1 is now present on DHCP2.
Rollback
- Logon to partner DHCP server.
- Open the DHCP console, right-click the server name.
- Select All Tasks and click Stop.
- Logon to primary DHCP server.
- Right click IPV4 and select Properties.
- On the IPV4 Properties page, click Failover tab.
- Select server pair and click Delete.
Hope you enjoy this post.
Cary
Twitter:@SifuSun
